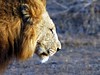
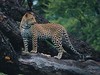
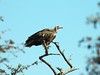
Taking Safari Pictures: Expert Advice (3/3) – For the Professional
SA Logue asked the University of the Witwatersrand’s Prof. David Bunn – one of the country’s top experts on the Kruger National Park – for some advice on which camera to pack when going to a game park. We’ve illustrated his response with pics from the kinds of cameras he refers to. This is part 2 of 3 – see the Expert Photo Advice tag for more.
.flickr-photo { }
.flickr-frame { float: left; text-align: center; margin-right: 15px; margin-bottom: 15px; }
.flickr-caption { font-size: 0.8em; margin-top: 0px; }
Level 3. For the REALLY serious photographer, with an eye toward selling wildlife photography for publication, you must visit the realm of expensive fixed lenses. What you pay for, with long lenses, is the “speed” or light-gathering capacity. Most professionals use one of the following, listed in descending order of price:
- A 600mm F4 lens. This costs as much as a small automobile (the quality kind, at any rate), and is really not worth investing in until you have proved that wildlife or sports photography is where you are going to make your career.
- A Tamron 400mm F2.8. Still very expensive, but a compromise at the top of the range.
- A Nikon or Canon 300mm F2.8, used in combination with 2X and 1.4 teleconverters. (With the 2x converter, you get a lens of 600mm and F5.6, which is marvellous for birds and distant predators.) It’s still expensive, but half the price of the ones above. This is the system I use, as do many of the professional wildlife photographers in SA.
- A 300mm F4 with 1.4 converter. This produces a result of 420mm and F5.6, which is really good for most top quality wildlife, but a teensie bit short for birds. If you are keen on wildlife generally, this is the lens to go for.
.flickr-photo { }
.flickr-frame { float: left; text-align: center; margin-right: 15px; margin-bottom: 15px; }
.flickr-caption { font-size: 0.8em; margin-top: 0px; }
Film v. digital: Purists will argue that digital is still not delivering the beautiful definition and color saturation of celluloid film, but the gap has narrowed so much that it’s virtually negligible. For professional-quality digital cameras, there really are only two players at the moment: Canon and Nikon.
Both have affordable 35mm-style SLR digital cameras which, most crucially, allow you to use a variety of interchangeable Canon or Nikon lenses (note: the two systems are NOT cross compatible). Newer lenses (those manufactured in the past 8 years or so) will also likely fit your new digital beast, so you can purchase long lenses second hand and use them. Make sure, though, that you try and inspect these lenses carefully before buying them, and that the autofocus function is retained when used on the new camera.
35mm-style digital is a beautiful system, and it should give you fabulous results in Kruger. Having a 300mm lens on a digital camera gives you other advantages: unlike others, who are battling for a good view of the landscape, you can poke your long lens through a small space of open window and get very good images. With a 300mm lens, you don’t need to carry around binoculars, either.
Laptops: It’s best to be able to download and edit images at night, when you get back from the last game drive, and for that there is no good substitute for a laptop. Taking a laptop to Kruger, though, is not really an option for travellers. The alternative is to take a number of heavy duty memory cards with you, and trash unworthy images using the camera’s own small screen. Remember, though, that you will probably take hundreds, rather than dozens of photos, so it’s best to invest in 4 or 5 very high capacity memory cards (512MB and up).
.flickr-photo { }
.flickr-frame { float: left; text-align: center; margin-right: 15px; margin-bottom: 15px; }
.flickr-caption { font-size: 0.8em; margin-top: 0px; }
Further notes:
- For all wildlife photography from cars, the engine should ideally be switched off and any long lens steadied on a support. By far the most versatile support is a bean bag draped over the window frame. (Make your own, or buy one.) Otherwise, you can get beautiful custom-made window mounted tripods from Kirk Enterprises. If you don’t have either of these, keep your shutter speed relatively high (nothing below 125 can be properly handheld without blurring). Use a towel or sweater over the window edge to provide some cushioned support if you are using a long lens.
- Use cans of compressed air to blow dust off lenses, and wipe lenses with lens cleaning cloth after breathing on it. I don’t use lens fluid.
Prof. Bunn is head of the Wits School of Arts.